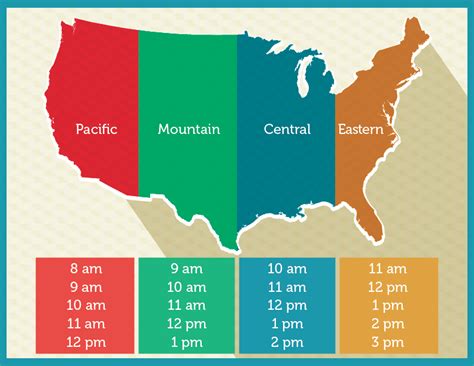
Design decisions in any project can be overwhelming, especially when it comes to choosing between horizontal and vertical design approaches. This guide aims to unravel the intricacies of horizontal versus vertical design and provide you with practical, step-by-step guidance. By the end of this guide, you'll have a clear understanding of when and how to implement each approach to best fit your project's needs. Let's dive into solving the horizontal versus vertical design dilemma and discover how to enhance your project's aesthetic and functionality.
Understanding Horizontal vs Vertical Design: An Overview
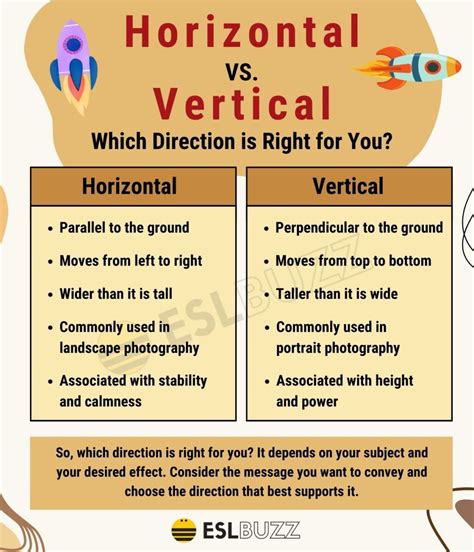
Design decisions fundamentally revolve around how you structure your content and layout. Horizontal design tends to focus on a wider, more extensive layout that flows left to right. Conversely, vertical design emphasizes a taller, narrower format, moving top to bottom. These choices impact not just aesthetics but also usability, navigation, and overall user experience.
In projects where you aim for a sleek, minimalist look, horizontal designs might shine with their clean lines and straightforward progression. On the other hand, vertical designs can provide a more detailed, intricate layout, perfect for projects that require thorough information breakdown.
Why Design Matters: Addressing User Needs
The decision between horizontal and vertical design is not merely about visual appeal; it directly influences how easily users interact with your project. For instance, horizontal designs can sometimes make navigation more straightforward, as users don’t need to scroll vertically as much. Conversely, vertical designs can be excellent for detailed information presentation, where the depth of content justifies the vertical flow.
Ultimately, the goal is to enhance the user experience by ensuring the design choices you make support your project’s objectives. By focusing on clarity, usability, and efficiency, you can guide users seamlessly through your content, regardless of the chosen design approach.
Quick Reference
Quick Reference
- Immediate action item with clear benefit: Opt for a horizontal layout for web navigation where a straightforward flow enhances user interaction.
- Essential tip with step-by-step guidance: Start with horizontal layouts on e-commerce sites to facilitate a seamless shopping experience; make vertical designs for detailed reports or manuals.
- Common mistake to avoid with solution: Avoid using both designs interchangeably on the same project without clear segmentation, which can confuse users and disrupt the user experience.
Implementing Horizontal Design: Step-by-Step Guide
Let’s delve into how to implement horizontal design effectively. This approach is particularly suited for projects where you need to maintain a clean, minimal look that allows users to focus on key elements without distractions.
Step 1: Define Your Layout
Begin by outlining your project’s primary content sections. For horizontal designs, this typically includes a header, main content area, and footer, all aligned in a side-by-side format.
- Header: Place navigation menus and logo here.
- Main Content: Display primary content like text, images, and interactive elements.
- Footer: Include contact information, social media links, and copyright details.
Step 2: Focus on Navigation
In horizontal layouts, navigation is key. Ensure your menu is clear, concise, and easily accessible from any section.
- Menu placement: Position the navigation menu on the top or side.
- Menu design: Use icons and text clearly to indicate different sections.
- Responsiveness: Make sure navigation adapts to different screen sizes.
Step 3: Use White Space Wisely
White space is a powerful tool in horizontal designs. It helps to break up large blocks of content, making your layout easier to read and more aesthetically pleasing.
- Balance: Ensure equal spacing around elements to avoid clutter.
- Highlight: Use white space to highlight important sections or calls to action.
Step 4: Consistent Design Elements
Consistency across all design elements can significantly enhance user experience and brand perception. Keep your color scheme, typography, and icons consistent throughout the layout.
- Color scheme: Use a harmonious palette to create a cohesive look.
- Typography: Stick to one or two fonts to maintain readability.
- Icons: Use the same style and size for all icons to create a unified appearance.
Step 5: Test and Iterate
No design is perfect on the first try. Conduct usability tests to gather feedback from real users. Use their input to make necessary adjustments for a smoother experience.
- Feedback tools: Use online tools like user testing platforms.
- Iterate: Make changes based on feedback to improve usability.
Adopting Vertical Design: Detailed Instructions
Vertical design is ideal for projects that benefit from detailed content breakdowns. It allows you to present information in a structured manner, making complex information easier to digest.
Step 1: Content Segmentation
Divide your content into clear, distinct sections. For vertical designs, this often involves breaking down the layout into a series of stacked elements.
- Header: Place at the top of the page.
- Sections: Each content section should follow in a vertical sequence.
- Footer: Position at the bottom of the layout.
Step 2: Hierarchy and Flow
Establish a clear visual hierarchy to guide users through the content. Use headings, subheadings, and bullet points to break up text and highlight important information.
- Headings: Use size and weight differences to indicate section importance.
- Subheadings: Break down major sections into smaller subsections.
- Bullet points: Use to list information clearly and concisely.
Step 3: Visual Breaks
Vertical layouts can be long and detailed. To prevent users from feeling overwhelmed, use visual breaks like lines, borders, and spacing to segment different content areas.
- Lines and borders: Use to separate distinct sections.
- Spacing: Use generous margins and padding between elements.
Step 4: Consistent Navigation
Despite the vertical nature of your layout, maintain clear and consistent navigation. Ensure users can easily find their way through the content.
- Sidebar: A vertical navigation menu on the side can guide users to different sections.
- Internal links: Use hyperlinks to connect related content within the vertical layout.
Step 5: Visual Hierarchy
Enhance readability by establishing a strong visual hierarchy. This means designing your layout so that the most important information stands out and is easily accessible.
- Font size: Larger fonts for main headings, smaller for subheadings and body text.
- Weight: Bolder fonts for important elements to draw attention.
- Color: Use contrasting colors to highlight key information.
Practical FAQ: Navigating Your Design Dilemma
Which design approach is better for mobile devices?
For mobile devices, horizontal designs often work best due to their simplicity and ease of navigation on smaller screens. However, consider using responsive design techniques to adapt vertical layouts to smaller screens. This involves stacking elements vertically and using hamburger menus for navigation. Testing both designs on various devices will help you determine which provides the best user experience.